Entries tagged 'cat:DIY' (Page 1)

USB/Serial PWM Fan Controller Using an Arduino

Entry created on 2020-11-22 (edited 2021-10-15) Authors: steeph (376) Categories: Arduino (4) Case Modding (11) Code (31) Computer (78) DIY (17) Electronics (16) Fans (1) Hardware (16) Projects (41) incomplete (22) Languages used: en (257) Topics: Projects → Arduino (4) Projects → Case Modding (9) edit

I wanted to be able to control the speed of the fans in my big NAS, Fred, individually. Even though the mainboard in use has five PWM fan connectors, the chipset can only control the speed of all fans together. There are probably good fan controllers commercially available that solve this problem better than I did. But they seemed overpriced and it seemed like a fun learning project for me.

The fan controller that I made uses an Arduino Nano clone that listens to it's serial port, waiting for a command to change the speed of a fan. When a command is recognised the continuous PWM signal for that fan is changed accordingly. It's possible to control up to six fans this way with an Arduino Nano. I'm only using three though since I only have three fan groups that need to be controlled separately.

The Arduino sketch/C code for the Arduino Nano that I used is as follows.


//fan speed sensor wire attached to digital pin 2 with a 10kohm pullup resistor
//fan PWM control wire attached directly to digital pin 9

#include <PWM.h> //include PWM library http://forum.arduino.cc/index.php?topic=117425.0

volatile int half_revolutions1; //allow half_revolutioins to be accesed in intterupt
volatile int half_revolutions2; //allow half_revolutioins to be accesed in intterupt
int rpm1; //set rpm as an integer
int rpm2; //set rpm as an integer
int pwm=255;
const byte numChars = 5;
char receivedChars[numChars];

boolean newData = false;

void setup()
{
  InitTimersSafe(); //not sure what this is for, but I think i need it for PWM control?
  bool success = SetPinFrequencySafe(9, 25000); //set frequency to 25kHz
  pwmWrite(9, 51); // 51=20% duty cycle, 255=100% duty cycle

  pinMode(5, OUTPUT);
  pinMode(6, OUTPUT);
  analogWrite(5, 170);
  analogWrite(6, 255);
  pinMode(2,INPUT_PULLUP); //set RPM pin to digital input
  pinMode(3,INPUT_PULLUP); //set RPM pin to digital input
  half_revolutions1 = 0;
  rpm1 = 0;
  half_revolutions2 = 0;
  rpm2 = 0;

  Serial.begin(9600);
}


void loop()
{
  sei(); //enable intterupts
  attachInterrupt(0, fan_rpm1, RISING); //record pulses as they rise
  delay(1000);
  detachInterrupt(0);
  attachInterrupt(1, fan_rpm2, RISING); //record pulses as they rise
  delay(1000);
  detachInterrupt(1);
  cli(); //disable intterupts

  rpm1 = (half_revolutions1/2)*60;

  Serial.print("1");
  Serial.println(rpm1);

  rpm2 = (half_revolutions2/2)*60;

  Serial.print("2");
  Serial.println(rpm2);

  rpm1 = 0;
  half_revolutions1 = 0;

  rpm2 = 0;
  half_revolutions2 = 0;

  pwm = 255;
  recvWithStartEndMarkers();
  processCommand();
}

void fan_rpm1()
{
  ++half_revolutions1; //increment before returning value
}


void fan_rpm2()
{
  ++half_revolutions2; //increment before returning value
}


void recvWithStartEndMarkers() {
    static boolean recvInProgress = false;
    static byte ndx = 0;
    char startMarker = 's';
    char endMarker = '\n';
    char rc;
 
    while (Serial.available() > 0 && newData == false) {
        rc = Serial.read();

        if (recvInProgress == true) {
            if (rc != endMarker) {
                receivedChars[ndx] = rc;
                ndx++;
                if (ndx >= numChars) {
                    ndx = numChars - 1;
                }
            }
            else {
                receivedChars[ndx] = '\0'; // terminate the string
                recvInProgress = false;
                ndx = 0;
                newData = true;
            }
        }

        else if (rc == startMarker) {
            recvInProgress = true;
        }
    }
}

void processCommand() {
    if (newData == true) {
        Serial.print("s");
        Serial.println(receivedChars);
        switch (receivedChars[0])
        {
            case '1':
                receivedChars[0] = '0';
                sscanf(receivedChars, "%d", &pwm);
                analogWrite(5, pwm);
                break;
            case '2':
                receivedChars[0] = '0';
                sscanf(receivedChars, "%d", &pwm);
                analogWrite(6, pwm);
                break;
            case '3':
                receivedChars[0] = '0';
                sscanf(receivedChars, "%d", &pwm);
                
                break;
//            default:
//                Serial.println("I don't know what that means.");
        }
        newData = false;
    }
}

Well, how should I put it? It works, usually.

(tbc?)

(tba:photos)
Comment via email

Project Idea And A Little Story: High Power PC Cooled Completely Passively With Heat Pipes And A Large Surface Aluminium Case And My First Online Post Ever

Entry created on 2021-06-02 Authors: steeph (376) Categories: Bulletin Boards (2) CPU Cooler (2) CPUs (5) Case Modding (11) Computer (78) Cooling (2) DIY (17) Heatsinks (2) Personal (13) Projects (41) Useless Memories (5) Languages used: en (257) Topics: Projects → Case Modding (9) Projects → Ideas (8) edit

Here is another project idea that I'll probably never realise. It's not really an ingenious idea or a new concept. But there is a reason for why I can't forget about it.

In the very early 2000s, when I started to tinker with PC cases and also made my first steps in web communities, I thought about how I could reduce the noise my computers made without running chips at dangurously hight temperatures or forgoing performance. I've read about heat pipes in some case modding community. And I thought why not take it to the extreme to move heat quickly not just to a larger heat sink than the CPU sockets could safely hold (Motherboards didn't have cooler brackets back then.) but to a heat sink or several heat sinks that cover the majority of the case's surface. When the first commercial CPU coolers with heat pipes came on the market, targetet at computer tinkerers, but still nobody in the community seemed to attempt to make a case with a huge heat sink on the outside of the wall to cool even a 2 GHz Pentium 4 with its 75 Watts TDP passively, I decided to register in a small case modding web forum and present my idea to see what might be wrong with the concept. I was actually younger 20 years ago than I am now and I had never before tried to get myself out there in such a way. I thought it was a rather good idea. But I wasn't sure how much surface and aluminium mass I needed and wether it was realistic to cool a powerful CPU passively that way. Trying to cool a Pentium 4 only passively sounds like a stupid idea after all.

So I created a post on said web forum that I've never read before, presented my idea and asked for opinions. I got a few answers and everybody seemed to think it was a stupid idea. One respondant didn't seem to get my idea but still seemed to think it was stupid. One person seemed rather friendly in comparison and asked if I could explain the idea in more detail. I felt bullied by the negative answers, I felt mocked by being inline quoted (which I don't think I had seen before) and I felt that my ideas were generally worthless since I wasn't one of those hobbyistic experts that actually know stuff and are able to answer questions asked in a web forum. So rather than explaining my idea in more detail as requested, I searched for a way to delete my post, didn't find one and asked in the same thread how I could remove it.

I didn't find the post when i searched for it a few years ago. Like most small web forums it has probably gone offline with nothing or almost nothing in a web archive. But with the experiece that I have today I suspect that I didn't explain my idea very well and the other forum members didn't realise that I was a very insecure child. I also realised many years later that it wasn't a bad idea. I even saw a computer case that implemented the same idea being sold at some point. I don't know if many people bought this. But at least somebody other than me seemed to think it made sense and could even be commercialised. This redeemed my idea in my mind and I started to think about making such a case again. But I don't have the need for high-power CPUs and didn't want to invest money into another project that I wouldn't ever finish once the initial exitement would be over by buying huge heat sinks and heat pipes. So I've added it to that huge imaginary list with projects that I like to would have done but likely wouldn't finish and conclude my decades long considerations and my decision to conclude them by writing this entry.

Done.

Comment via email

Tardie Clock

Entry Permalink (edited 2021-04-02) Authors: steeph (376) Categories: Clocks (2) DIY (17) Light (4) Projects (41) Languages used: en (257) Topics: Projects → Light (2) edit

There are more than two ways to display the time. There are a few project ideas in my head to create clocks that don't use digits or hands but tell you the time in non-conventional ways. At some point I wanted to make a clock that uses a method that I've never seen or heard of before. I came up with one that uses colour scales for hours, minutes and seconds. This is the one i have actually built.

I chose a picture from My Little Pony: Friendship is Magic that's related to time. Fans of the show know why I called it Tardie. Three parts of the picture are laser etched in three sheets of acrylic. Each sheet has RGB LEDs on its side so each sheet can be individually lit in a different colour. An Arduino Pro Mini and a realtime clock module control the colours of the three LED strips.

So you can tell the hours by looking at the colour of the pony (hours - horse), the minutes from the colour of the mane (minutes - mane) and the seconds from the eye colour (seconds - seducing eyes). The idea was that by looking at it multiple times a day, then looking at an actual clock, you could learn to tell the time almost instantly by looking at the colours. But I didn't get around to print the colour scale for reference, yet. And I don't hape room for the thing on my desk anyway. There is a clock on my screen that doesn't take up so much space. So I can only say that it works in theory.

File Attachments (25 files)
Tardie Clock-IMG_20180904_1459106.jpg (image/jpeg, 1484171 B)
Tardie Clock-IMG_20180904_1459187.jpg (image/jpeg, 2389848 B)
Tardie Clock-IMG_20180904_1459276.jpg (image/jpeg, 2050567 B)
Tardie Clock-IMG_20180904_1500153.jpg (image/jpeg, 1700865 B)
Tardie Clock-IMG_20180904_1500202.jpg (image/jpeg, 1449945 B)
Tardie Clock-IMG_20180904_1500250.jpg (image/jpeg, 1376389 B)
Tardie Clock-IMG_20180904_1500582.jpg (image/jpeg, 1162918 B)
Tardie Clock-IMG_20180904_1501011.jpg (image/jpeg, 1427312 B)
Tardie Clock-IMG_20180904_1501108.jpg (image/jpeg, 1448423 B)
Tardie Clock-IMG_20180904_2022557.jpg (image/jpeg, 1797897 B)
Tardie Clock-IMG_20180904_2023008.jpg (image/jpeg, 1766878 B)
Tardie Clock-IMG_20180904_2100167.jpg (image/jpeg, 1463310 B)
Tardie Clock-IMG_20180907_1029424.jpg (image/jpeg, 1921005 B)
Tardie Clock-IMG_20180907_1030001.jpg (image/jpeg, 1426938 B)
Tardie Clock-IMG_6919.JPG (image/jpeg, 1303770 B)
Tardie Clock-IMG_6921.JPG (image/jpeg, 1540666 B)
Tardie Clock-IMG_6922.JPG (image/jpeg, 1540687 B)
Tardie Clock-IMG_6925.JPG (image/jpeg, 1483687 B)
Tardie Clock-IMG_6926.JPG (image/jpeg, 1853658 B)
Tardie Clock-IMG_6927.JPG (image/jpeg, 2214036 B)
Tardie Clock-IMG_6929.JPG (image/jpeg, 2071250 B)
Tardie Clock-IMG_6931.JPG (image/jpeg, 3491469 B)
Tardie Clock-IMG_6932.JPG (image/jpeg, 2428694 B)
Tardie Clock-IMG_6935.JPG (image/jpeg, 2407173 B)
Tardie Clock-IMG_6936.JPG (image/jpeg, 2617543 B)
Comment via email

Just Try It! It Will Have Been Simple Afterwards.

Entry created on 2021-03-18 Authors: steeph (376) Categories: ADHD (3) DIY (17) Procrastination (1) Thoughts (73) Languages used: en (257) edit

Again and again I encounter technical problems (software bugs, hardware defects) that seem to be nearly impossible to fix without having had a proper education in the respective field. The simple, and correct, way to getting rid of these types of problems surely is to declare them not a problem. Buy a new device, convince yourself that you don't want the feature anyway, make somebody else solve your problem and blame them if it isn't perfect or breaks again.

But in those cases where I do find the motivation to try and repair something myself, it is often easier than expected and always so in hindsight. If you have repaired something yourself before that you initially considered to be a problem that is above your capabilities, I congratulate you on this eminently gratifying feeling that more often than not seems to come with this experience. If you haven't, this sentence doesn't address you.

Comment via email

USB Volume Control Knob

Entry created on 2020-12-04 Authors: steeph (376) Categories: Arduino (4) Computer (78) DIY (17) Electronics (16) Projects (41) incomplete (22) Languages used: en (257) Topics: Projects → Arduino (4) edit

Volume control used to be a lot more responsive, quick and simple when the used potentiometers (analogue knobs or wheels). Just reach to the knob and the volume is at 0 or 100% almost instantly. No key combinations, no deactivated function keys, no switching tabs, no delay (!), no pressing the same botton multiple times or holding it down. I miss that.

(tba:content)

Comment via email

Fujitsu Cordant Pentium II Aluminium Case Mod

Entry created on 2020-03-08 (edited 2020-09-27) Authors: steeph (376) Categories: Case Modding (11) Computer (78) DIY (17) Hardware (16) Projects (41) Languages used: en (257) Topics: Projects → Case Modding (9) edit

I always wanted an aluminium case. A friend gave me this Pentium II he finally decided to get rid of last year. Nice PC, but even nicer in black and with newer hardware in it.

I suck at spray painting and I need to get better paint next time. But if the light comes from the right angle it looks like I imagined it.

I replaced the key lock with a large screw, got rid of the drive cages, replaced the PSU and mainboard, added a graphics card with internally pluggable VGA, replaced the external VGA port with a serial port and added a small LCD panel where the drives used to be, connected internally to the unplugged VGA port. Oh, and green LED strips. I also added two 60 mm fans in the back. I didn't want to cut a whole in any of the other sides, so 60 mm was the largest possible size. Still better than none.

And yes, I actually have a use for a RS232 port.

The main reason I put in the LCD is because I can. I liked the idea ever since I saw a build with a two-line character LCD for status messages around 2004. But nowadays there is a lot more space on the front since optical drives and diskette drives have become rare. So why not make it a regular screen that can be addressed by the OS without much custom code? The idea is to have it display CPU load, temps, notifications and stuff. But I may end up using it mainly for art, animations. I'm not sure, yet.

File Attachments (34 files)
blackalucase-IMG_1082.JPG (image/jpeg, 2235156 B)
blackalucase-IMG_1083b.JPG (image/jpeg, 2177437 B)
blackalucase-IMG_1084b.JPG (image/jpeg, 3142205 B)
blackalucase-IMG_1085b.JPG (image/jpeg, 2959783 B)
blackalucase-PXL_20210508_183156593.jpg (image/jpeg, 2037724 B)
blackalucase-PXL_20210508_183209328.jpg (image/jpeg, 2705989 B)
blackalucase-PXL_20210509_073811572.jpg (image/jpeg, 2505885 B)
blackalucase-PXL_20210510_040253140.jpg (image/jpeg, 3253749 B)
blackalucase-PXL_20210602_163806553.jpg (image/jpeg, 2926498 B)
blackalucase-_MG_1083.JPG (image/jpeg, 2963638 B)
blackalucase-_MG_1086.JPG (image/jpeg, 3330315 B)
blackalucase-_MG_1089.JPG (image/jpeg, 4592109 B)
blackalucase-_MG_1093.JPG (image/jpeg, 5072351 B)
blackalucase-_MG_1094.JPG (image/jpeg, 3363631 B)
blackalucase-_MG_1097.JPG (image/jpeg, 4823630 B)
blackalucase-_MG_1098.JPG (image/jpeg, 4400245 B)
blackalucase-_MG_1104.JPG (image/jpeg, 6064291 B)
blackalucase-_MG_1106.JPG (image/jpeg, 4694610 B)
blackalucase-_MG_1108.JPG (image/jpeg, 5388781 B)
blackalucase-_MG_1113.JPG (image/jpeg, 4482483 B)
blackalucase-_MG_1115.JPG (image/jpeg, 3733932 B)
blackalucase-_MG_1120.JPG (image/jpeg, 3682694 B)
blackalucase-_MG_1130.JPG (image/jpeg, 4821898 B)
blackalucase-_MG_1133.JPG (image/jpeg, 1156963 B)
blackalucase-_MG_1136.JPG (image/jpeg, 2886411 B)
blackalucase-_MG_1143.JPG (image/jpeg, 3382900 B)
blackalucase-_MG_1148.JPG (image/jpeg, 3295611 B)
blackalucase-_MG_1150.JPG (image/jpeg, 3654553 B)
blackalucase-_MG_1151.JPG (image/jpeg, 4074495 B)
blackalucase-_MG_1153.JPG (image/jpeg, 3053380 B)
blackalucase-_MG_1154.JPG (image/jpeg, 2205086 B)
blackalucase-_MG_1159.JPG (image/jpeg, 3127239 B)
blackalucase-_MG_1161.JPG (image/jpeg, 2927544 B)
blackalucase-beforeafter.jpeg (image/jpeg, 4506606 B)
Comment via email

LED Pictures

Entry Permalink (edited 2020-09-19) Authors: steeph (376) Categories: DIY (17) Light (4) Pinkie Pie (3) Projects (41) Languages used: en (257) Topics: Projects (59) edit

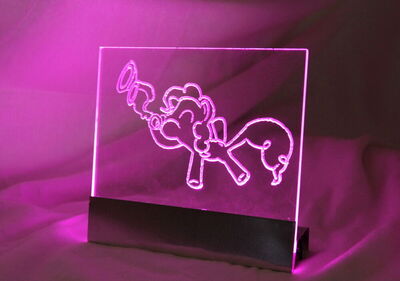
An unremembered number of years ago I started wanting to make at least one picture like this. A picture engraved into a transparent polymer sheet, lit by LEDs from the side. The light gets scattered in the rough places of the sheet. If the LEDs are hidden, e.g. in a frame, this makes it look like the transparent picture itself is glowing. I liked the idea - probably seen it somewhere. And I knew I'm not good at making pictures - be it with paint or an engraving cutter. So I didn't do it. Usually this is the end with ideas like this of mine.

I couldn't get rid of the idea for years though. And some day I made one. It didn't look good but I liked it. I made a few more and applied more efford this time.

I saw a potential to become better at this (and still do) so I made more and more. And about 7 years later I have made hundrets of them. (Sold most of them.) Attached are a few I like best.

File Attachments (27 files)
LED-pictures-IMG_20180904_1501108.jpg (image/jpeg, 154847 B)
LED-pictures-IMG_20180905_0239335.jpg (image/jpeg, 89611 B)
LED-pictures-RZL_1000.jpg (image/jpeg, 103647 B)
LED-pictures-_MG_7056b1000.JPG (image/jpeg, 123066 B)
LED-pictures-another_rainbow_dash_acrylic_led_picture_by_steeph_k_da3aauo.jpg (image/jpeg, 84049 B)
LED-pictures-applejack_cutie_mark___multi_colored_led_picture_by_steeph_k_da48hoi.jpg (image/jpeg, 57679 B)
LED-pictures-applejack_cutie_mark_acrylic_block_led_picture_by_steeph_k_da24vzk.jpg (image/jpeg, 91616 B)
LED-pictures-canni_soda_acrylic_led_picture_by_steeph_k_da24wnk.jpg (image/jpeg, 111226 B)
LED-pictures-cutie_mark_crusaders_acrylic_led_picture_by_steeph_k_dc5lsy7.jpg (image/jpeg, 149825 B)
LED-pictures-cutie_mark_crusaders_logo_acrylic_led_picture_by_steeph_k_d9zdwwp.jpg (image/jpeg, 205219 B)
LED-pictures-daring_do_acrylic_led_picture_by_steeph_k_d9zdvoo.jpg (image/jpeg, 122848 B)
LED-pictures-fluttershy_acrylic_led_picture_by_steeph_k_d9pdapn.jpg (image/jpeg, 109975 B)
LED-pictures-fluttershy_acrylic_led_picture_by_steeph_k_d9rusmw.jpg (image/jpeg, 117685 B)
LED-pictures-fluttershy_s_cutiemark_in_acrylic_block_by_steeph_k_d6uf9v7.jpg (image/jpeg, 152978 B)
LED-pictures-lyra_and_bon_bon_acrylic_led_picture_by_steeph_k_d9ry7ie.jpg (image/jpeg, 152492 B)
LED-pictures-pinkie_pie_acrylic_led_picture_by_steeph_k_d6bzjou.jpg (image/jpeg, 102091 B)
LED-pictures-pinkie_pie_acrylic_led_picture_by_steeph_k_d9pd9z3.jpg (image/jpeg, 124027 B)
LED-pictures-pinkie_pie_by_steeph_k_da5su9v.jpg (image/jpeg, 105282 B)
LED-pictures-pinkie_pie_cutie_mark___multi_colored_led_picture_by_steeph_k_da5v5ob.jpg (image/jpeg, 140696 B)
LED-pictures-pinkie_pie_cutie_mark_acrylic_led_picture_by_steeph_k_dc5lwy0.jpg (image/jpeg, 123627 B)
LED-pictures-princess_celestia_led_picture_in_mirror_by_steeph_k_d9d2yit.jpg (image/jpeg, 222735 B)
LED-pictures-queen_chrysalis_acrylic_led_picture_by_steeph_k_d9w2clx.jpg (image/jpeg, 133278 B)
LED-pictures-queen_chrysalis_acrylic_led_picture_by_steeph_k_da3w42m.jpg (image/jpeg, 114791 B)
LED-pictures-rarity_cutie_mark_acrylic_block_led_picture_by_steeph_k_da24vsi.jpg (image/jpeg, 90352 B)
LED-pictures-scootaloo_cutie_mark_led_picture_by_steeph_k_d9cmgph.jpg (image/jpeg, 148415 B)
LED-pictures-sleeping_rainbow_dash_acrylic_led_picture_by_steeph_k_d9pda8i.jpg (image/jpeg, 120412 B)
LED-pictures-vinyl_scratch_led_picture_by_steeph_k_daayerp.jpg (image/jpeg, 123649 B)
Comment via email

80s Loudspeaker Mini-ITX Case

Entry created on 2020-09-18 Authors: steeph (376) Categories: Case Modding (11) Computer (78) DIY (17) ITX (1) Router (1) Speaker Box (1) Languages used: en (257) Topics: Projects → Case Modding (9) edit

My old router had been case-less long enough. So I've built this mini-ITX case from an 80s speaker.

When I saw these old plastic speaker boxes in a pile of scrap on the side of the street I just had to save them. I always see things and think: Huh, I could put a computer or something in there. The same in this case. I finally found something I wanted to put this old mini-ITX machine into.

I cut away most of the inner support structure and the beams that held the back cover on, cut off part of the back cover so the PSU fits (It fits so perfectly! It's not even mounted by anything and I can really push and pull the wire as much as I want.), cut holes in what was now the new back side, fiddled a bit and wrapped the sides in matte black foil.

It was usable at that point. The back cover is held in place a bit by the mainboard hardly fitting. Then I just glued on those wooden "feet". Their main purpose is to prevent the back cover from coming off unless the wall is strained/pulled out a bit. Such a messy built, but I'm very happy with how perfectly everything sits in place now.

Added two LED strips, a power button and a switch for the light afterwards. Now I consider it done.

File Attachments (22 files)
mITXbox-IMG_20200904_154812.jpg (image/jpeg, 1705439 B)
mITXbox-IMG_20200904_154822.jpg (image/jpeg, 1824493 B)
mITXbox-IMG_20200904_154831.jpg (image/jpeg, 1834016 B)
mITXbox-IMG_20200904_154848.jpg (image/jpeg, 3814066 B)
mITXbox-IMG_20200904_154858.jpg (image/jpeg, 1883720 B)
mITXbox-IMG_20200904_155033.jpg (image/jpeg, 1946908 B)
mITXbox-IMG_20200904_155108.jpg (image/jpeg, 1531296 B)
mITXbox-IMG_20200904_155141.jpg (image/jpeg, 1641409 B)
mITXbox-IMG_20200904_155246.jpg (image/jpeg, 1832620 B)
mITXbox-PXL_20210317_173249288.jpg (image/jpeg, 2993776 B)
mITXbox-PXL_20210317_173325118.jpg (image/jpeg, 2961553 B)
mITXbox-IMG_20200904_154812.jpg (image/jpeg, 147282 B)
mITXbox-IMG_20200904_154822.jpg (image/jpeg, 155766 B)
mITXbox-IMG_20200904_154831.jpg (image/jpeg, 153792 B)
mITXbox-IMG_20200904_154848.jpg (image/jpeg, 286280 B)
mITXbox-IMG_20200904_154858.jpg (image/jpeg, 154751 B)
mITXbox-IMG_20200904_155033.jpg (image/jpeg, 159596 B)
mITXbox-IMG_20200904_155050.jpg (image/jpeg, 146724 B)
mITXbox-IMG_20200904_155108.jpg (image/jpeg, 100136 B)
mITXbox-IMG_20200904_155141.jpg (image/jpeg, 145425 B)
mITXbox-IMG_20200904_155240.jpg (image/jpeg, 165060 B)
mITXbox-IMG_20200904_155246.jpg (image/jpeg, 143470 B)
Comment via email
Go To Navigation Page
Show/Hide Navigation
Mastodon